
For the past few weeks, I’ve been studying for the AWS Certified Advanced Networking Specialty exam. So far, I’ve been primarily using A Cloud Guru. They have great content, engaging instructors, and it all treated me very well during my preparation for the AWS Solutions Architect exam. However, one thing I’ve noticed so far that is missing from the Advanced Networking course are labs: pre-canned scenarios where I can put into practice the topics discussed and covered in the course.
I don’t entirely blame A Cloud Guru for the lack of this content; it’s really due to the fundamental idea behind this certification why labs are difficult to construct and play with in order to get first-hand knowledge of the covered topics. That fundamental idea is the foundational knowledge behind this certification deals with hybrid networking: connecting on-premise network infrastructures to the cloud–one way or another. If one doesn’t have the equipment or the authority or whatever to connect from their own data center, or capability to mimic one, much of the knowledge taught in this course or behind this certification is largely theoretical. My goal here (and with the coming part two) is to create architectures which mimic hybrid cloud network topologies. And not only so I (and you) can build these out as detailed in this post, but also so I can experiment and become comfortable with all the aspects of hybrid architectures: design, engineering, and troubleshooting. So with that…
Dynamic “Hardware” VPNs using Cisco Cloud Service Routers
Upfront Warning: This lab will cost you money!
It’s not a lot, but if you forget to terminate an instance or leave the VPN
connection associated, it could get expensive. Items in this lab which will cost you money are:
- Site-to-Site VPN – $0.05 per connection-hour.
- Cisco CSR 1000v t2.medium – $0.046 per connection-hour.
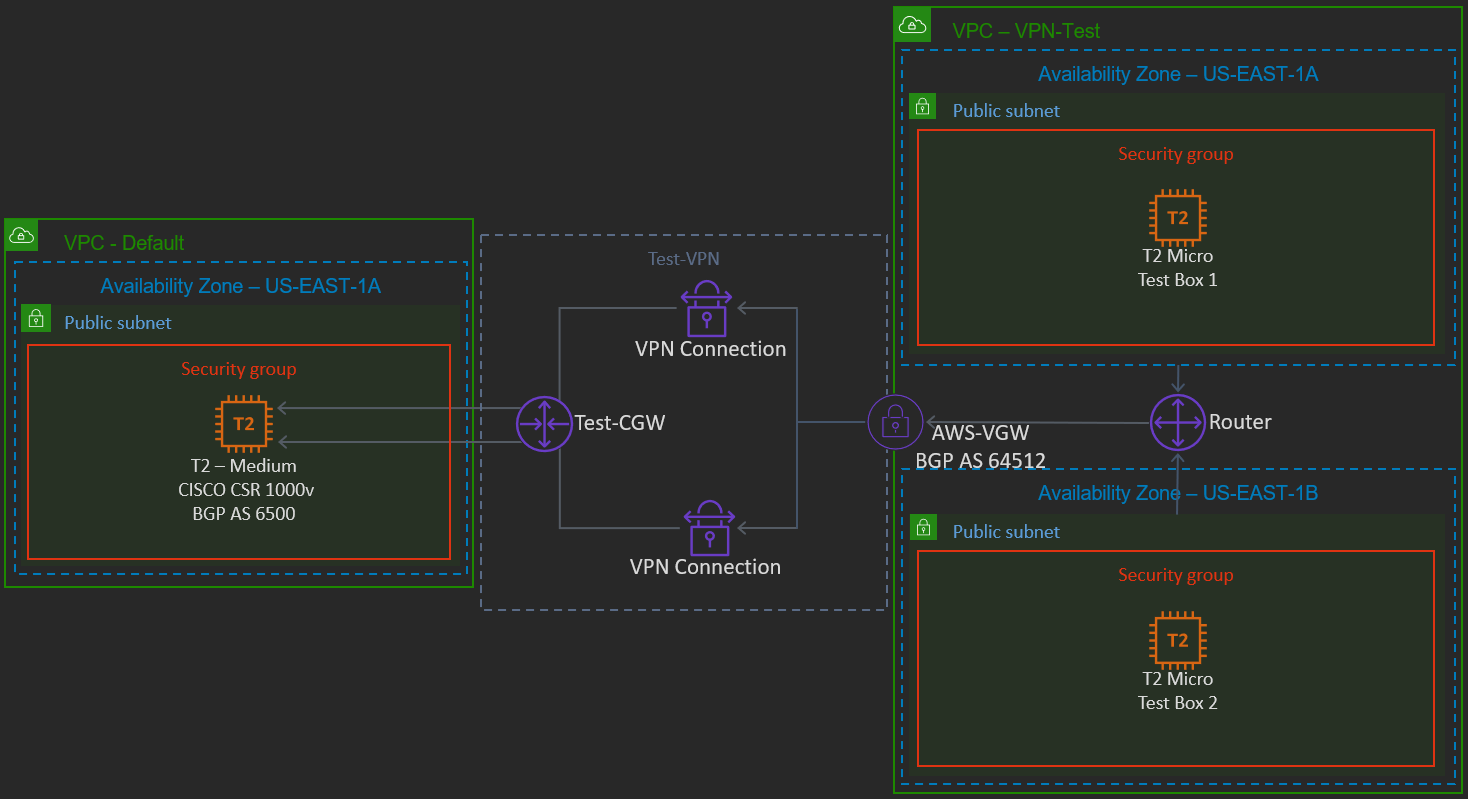
With this architecture, we will mimic a hardware VPN connection into an AWS VPC using a Cisco Cloud Service Router, or CSR. CSRs are virtual router instances which one can spin up as an EC2 instance. We’ll use a single CSR in the default VPC to build two tunnels back to another custom VPC VPN Gateway within the same AWS account.

Prerequisites
Going into this lab, I’ll make an assumption you have a basic understanding of the AWS environment. With that understanding, there are a couple of prerequisite items which need to be configured prior to proceeding with the the VPN configuration:
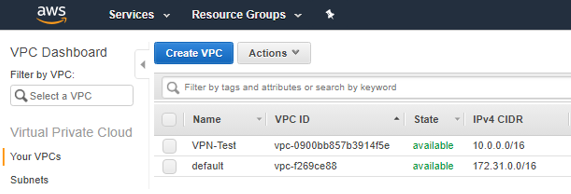
- A default VPC – This is the VPC from which we will launch the Cisco CSR 1000v virtual router. This default VPC will mimic our on-premise data center.
- A custom VPC – A second VPC within the same AWS account. Ensure this VPC has two associated subnets; which AZ/subnets don’t matter. Preferably, the CIDR block for this subnet does not overlap with any in the default VPC. This custom VPC will be our true cloud data center, from which we would host our cloud instances, such as web, database, or any other virtual servers.
For purposes of this walk-through, my reference VPCs look like this:
Cisco CSR1000v
Once the prerequisites are in place, we can create the items required for the site-to-site VPN. First up, the CSR:
- Before running Cisco CSRs, you will be required to “subscribe” to the CSRs as a service (and accepting the license agreement). Don’t worry, you won’t be charged yet…only for when actually running a CSR instance. To subscribe (and see pricing) go here: https://aws.amazon.com/marketplace/pp/B00NF48FI2?ref=cns_1clkPro
- From the link above, click Continue to Subscribe. Once subscribed, click Continue to Configuration.
- On the resulting page, click Continue to Launch.
- Under Choose Action, select Launch through EC2; this should bring you back to the all-to-familiar EC2 launch wizard. Ensure the t2.medium instance type (the cheapest) is selected. Click Next: Configure Instance Details.
- On the instance details page, ensure the default VPC is selected under Network. Click Review and Launch Instance as all other defaults will work.
- Click View Instances. From the EC2 dashboard, ensure to copy the CSRs public IP as we’ll need this in the next few steps.
Customer Gateway
The CSR will take a little longer to fully load than a regular EC2 instance. While that’s loading, we can configure the customer gateway–the parameters which define the “on-prem” side of the VPN connection.
- First, navigate to the VPC dashboard within the AWS console.
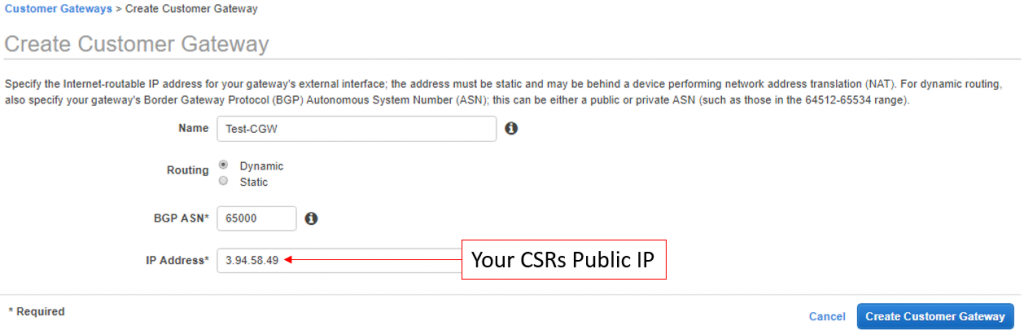
- On the page’s left hand menu, click Customer Gateway, and then the Create Customer Gateway button.
- Input the CGW’s name, ASN, and the public IP of the CSR instance (copied from the previous step.) For Routing, ensure to select Dynamic.
- Click Create Customer Gateway.
Virtual Private Gateway
Next, we’ll create the AWS side of the VPN connection.
- While still in the VPC dashboard, click Virtual Private Gateways on the left side menu.
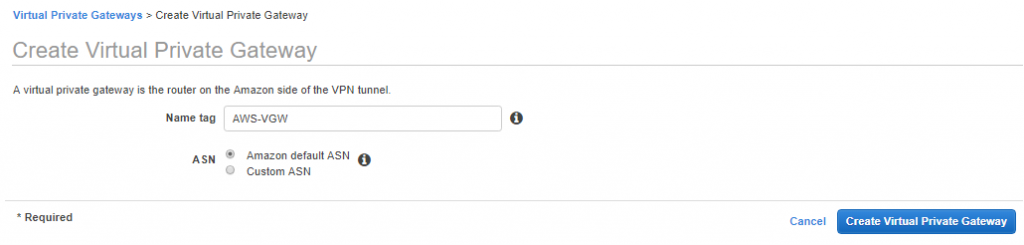
- Click the Create Virtual Private Gateway button.
- Enter a name and ensure the Amazon default ASN is selected.
- Click Create Virtual Private Gateway to continue.
- Before we leave the VGW Dashboard, we must attach the VGW to a VPC. Select the newly created VGW, click Actions, and then Attach to VPC.
- The Attach to VPC page will load. Select the desired VPC, and then click Yes, Attach.
Site-to-Site VPN Connection
In this next step, we’ll configure the VPN parameters, linking the CGW and VGW.
- Also while still in the VPC Dashboard, click Site-to-Site VPN Connections.
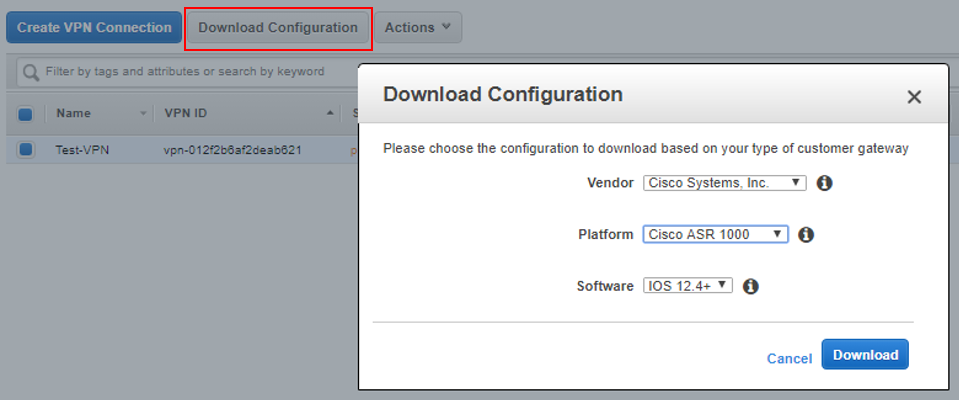
- Click the Create VPN Connection.
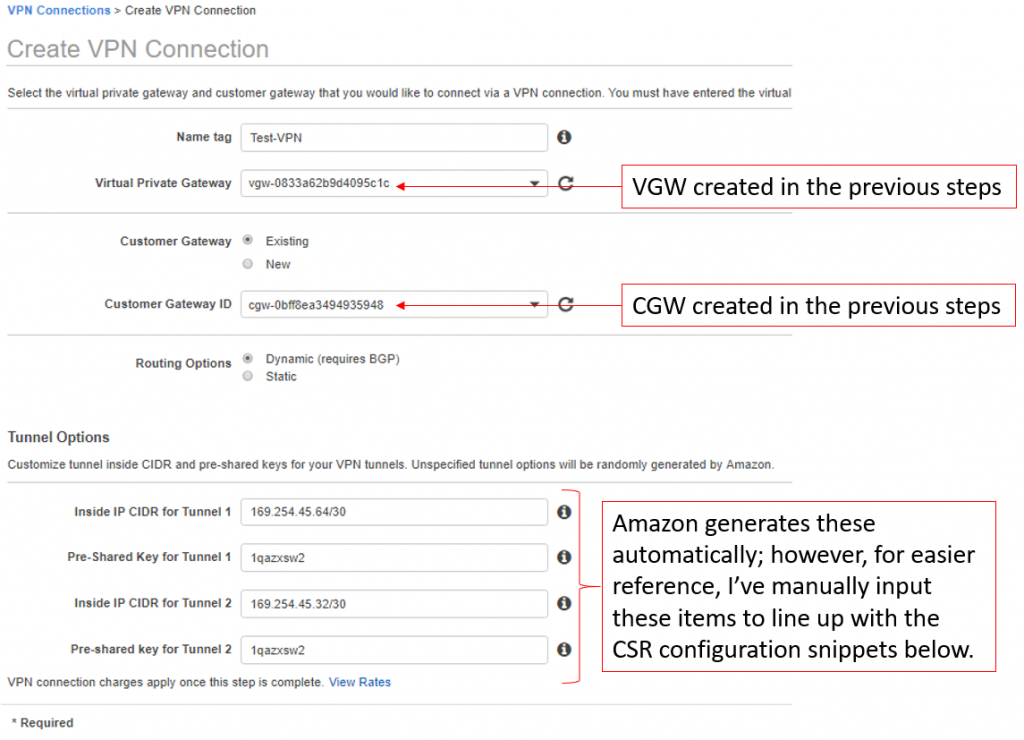
- Input a VPN Name and select the VGW and CGW created in the previous steps.
- For tunnel options, you can technically leave all of these fields blank; however, if you wish to utilize the router configuration snippets I provide below for the CSR, use the same pre-shared key, 169.254.45.64/30 for Inside IP CIDR for Tunnel 1, and 169.254.45.32/30 for Inside IP CIDR for Tunnel 2.
Note the AWS Outside IPs
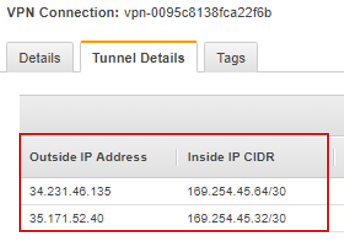
Before we leave the VPC dashboard we need to ensure we’ve noted the outside IPs in use on the AWS end of the VPN connection. These are the IPs used to source the secure VPN tunnel on the cloud side of the connection, and will need to be input into the CSR configuration snippets to successfully build the VPN tunnel.
- In the VPC Dashboard, click Site-to-Site VPN Connections.
- Select the newly created VPN connection.
- Near the bottom of the screen, click the Tunnel Details tab.
- Write-down or take a screenshot of the outside to inside IP mappings, as shown in the screenshot below.
Enable Route Table Propagation
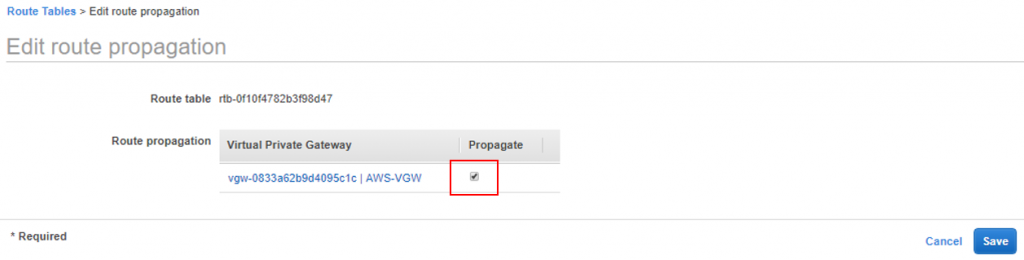
In order for routes to be dynamically propagated between the AWS VPC and the CSR, you’ll need to enable route table propagation.
- Within the VPC Dashboard, click Route Tables.
- Select the route table for the Test-VPN VPC.
- Click the Route Propagation Tab on the menu near the bottom of the window, then click Edit Route Propagation.
- Select the check box under the Propagate column.
Final CSR Configurations
Now that all the AWS side VPN configurations are completed, we’ll move on to configuring the guts of the CSR. These are the last steps!
- Launch your favorite terminal emulator software (i.e. Putty) or shell prompt, and connect to the public IP of your CSR router. Note, if you accepted all the defaults when creating the CSR, it also created a new security group. Modify this security group to allow SSH access from your workstation’s IP. If logging in from a shell prompt, the default username for the CSR is ec2-user (NOT root as indicated in some CSR documentation.)
- Once successfully logged in, enter global configuration mode by typing config t, and then hit enter.
- We’ll use the snippet below to configure our CSR; before pasting this into the CLI, note the text in read; this needs to be updated with your own outside IP mapped to tunnel one. Simply copy to a text editor and replace the instances of “OUTSIDE-IP-#1” with the full IP address. Also note, this snippet is only for one of two VPN tunnels (the second tunnel configs are at the bottom of this post.)
!==================
!IKE Phase I Configs - Tunnel1
!===================
crypto isakmp policy 200
  encryption aes 128
  authentication pre-share
  group 2
  lifetime 28800
  hash sha
exit
!
crypto keyring keyring-vpn-01
  local-address GigabitEthernet1
  pre-shared-key address OUTSIDE-IP-#1 key 1qazxsw2
exit
!
crypto isakmp profile isakmp-vpn-01
  local-address GigabitEthernet1
  match identity address OUTSIDE-IP-#1
  keyring keyring-vpn-01
exit
!
!
!==================
!IKE Phase 2 Configs - Tunnel1
!===================
crypto ipsec transform-set ipsec-prop-vpn-01 esp-aes 128 esp-sha-hmac
  mode tunnel
exit
!
crypto ipsec profile ipsec-vpn-01
  set pfs group2
  set security-association lifetime seconds 3600
  set transform-set ipsec-prop-vpn-01
exit
!
crypto ipsec df-bit clear
crypto isakmp keepalive 10 10 on-demand
crypto ipsec security-association replay window-size 128
crypto ipsec fragmentation before-encryption
!
!
!==================
!Tunnel 1 Configs
!===================
interface Tunnel1
  ip address 169.254.45.66 255.255.255.252
  ip virtual-reassembly
  tunnel source GigabitEthernet1
  tunnel destination OUTSIDE-IP-#1
  tunnel mode ipsec ipv4
  tunnel protection ipsec profile ipsec-vpn-01
  ip tcp adjust-mss 1379
  no shutdown
exit
!
!
!==================
!BGP Configs - Tunnel1
!===================
router bgp 65000
  neighbor 169.254.45.65 remote-as 64512
  neighbor 169.254.45.65 activate
  neighbor 169.254.45.65 timers 10 30 30
  address-family ipv4 unicast
    neighbor 169.254.45.65 remote-as 64512
    neighbor 169.254.45.65 timers 10 30 30
    neighbor 169.254.45.65 default-originate
    neighbor 169.254.45.65 activate
    neighbor 169.254.45.65 soft-reconfiguration inbound
    network 0.0.0.0
  exit
exit
!
Verification
To verify everything is up and working, lets start with the CSR. Within the CSR CLI, make sure you are at Privileged Exec mode (it shouldn’t say
“(config)” to the left of the # symbol; if it does, type exit.) Then type show crypto isakmp sa. You should see the following output:

QM_IDLE is a good thing. If the output shows MM_NO_STATE under the state column, then phase 1 is failing, and you need to check the phase 1 portion of your configuration. Also, ensure you have a layer 3 path to the distant end address by pinging the “identity” address or outside IP on the AWS side.
Next, type show ip bgp sum to list the BGP neighbors the CSR has established. In the output below, we can see that we currently have 1 neighbor, it’s been up for 50 minutes and 39 seconds, and 1 prefix (or route) has been received. If the state remains at idle or active, something is likely wrong with the tunnel interface or the BGP configuration.

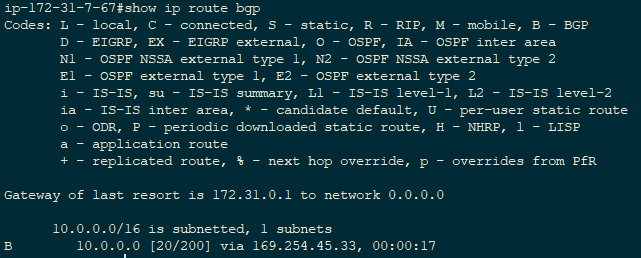
If we are BGP peers with the AWS VPC, we should also see some routes being learned from that peer in the CSRs route table, and according to the output above we are. To verify this, type show ip route bgp at the CSR CLI. In the output below, we are learning the 10.0.0.0/16 route via the 169.254.45.32 tunnel.
Now, check the AWS console to ensure it’s happy with the VPN.
- Go to the VPC Dashboard, and click on Site-to-Site VPN Connections.
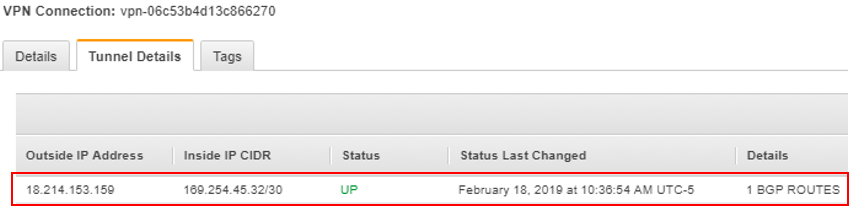
- Select the newly created VPN connection, and then click on the Tunnel Details tab near the bottom of the window. Here you should see a status of UP for any tunnel you’ve configured on the CSR.
And last, we’ll want to check the routes being propagated into the AWS VPC router.
- Go to the VPC Dashboard, and click on Route Tables.
- Click on the route table for the VPN-Test VPC.
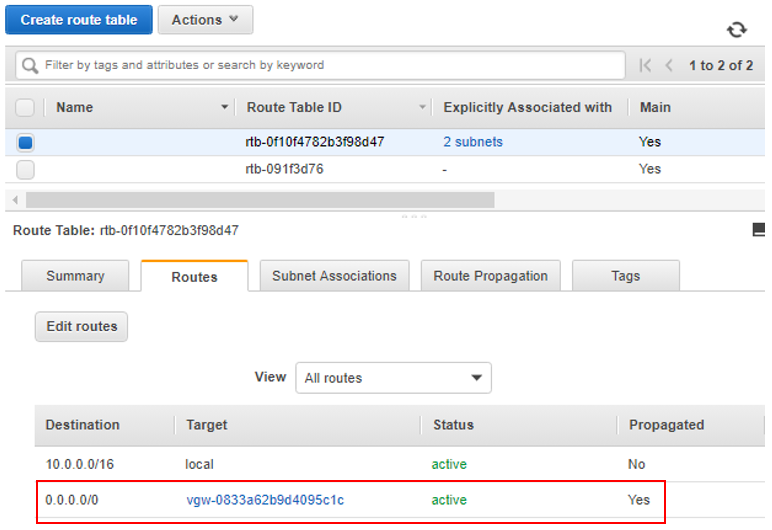
- Then click the Routes tab near the bottom of the window. With what we’ve configured so far, we should see a default 0.0.0.0/0 route being advertised into the VPC from the CSR.
Final Notes
AWS Does provide somewhat customized configuration snippets for a variety of on-premises networking devices, for loading into your organic equipment. These configs contain a bunch of useful comments describing what each line of the configuration does, and what else can be modified, such as advertising additional networks. I recommend checking these out.
You’ll probably also note we’ve only done one tunnel configuration here so far and that the pre-canned configuration provided by AWS has two of everything: two phase 1 configurations, two phase 2, two tunnel interfaces, etc. This is for high-availability. Below is the second tunnel configuration to get both tunnels up and working.
Aside from configuring the remaining tunnel, we can now play around a bit. For example, I can add some regular Linux EC2 instances to my Test-VPN VPC and test reachability to the CSR (but keep in mind security groups will probably need to be modified to allow inbound traffic to those instances from the CSR.)
Remaining Configs (Tunnel 2)
!==================
!IKE Phase I Configs - Tunnel2
!===================
crypto isakmp policy 201
  encryption aes 128
  authentication pre-share
  group 2
  lifetime 28800
  hash sha
exit
!
crypto keyring keyring-vpn-02
  local-address GigabitEthernet1
  pre-shared-key address OUTSIDE-IP-#2 key 1qazxsw2
exit
!
crypto isakmp profile isakmp-vpn-02
  local-address GigabitEthernet1
  match identity address OUTSIDE-IP-#2
  keyring keyring-vpn-02
exit
!
!==================
!IKE Phase 2 Configs - Tunnel2
!===================
crypto ipsec transform-set ipsec-prop-vpn-02 esp-aes 128 esp-sha-hmac
  mode tunnel
exit
!
crypto ipsec profile ipsec-vpn-02
  set pfs group2
  set security-association lifetime seconds 3600
  set transform-set ipsec-prop-vpn-02
exit
!
crypto ipsec df-bit clear
crypto isakmp keepalive 10 10 on-demand
crypto ipsec security-association replay window-size 128
crypto ipsec fragmentation before-encryption
!
!
!==================
!Tunnel 2 Configs - Tunnel2
!===================
interface Tunnel2
  ip address 169.254.45.34 255.255.255.252
  ip virtual-reassembly
  tunnel source GigabitEthernet1
  tunnel destination OUTSIDE-IP-#2
  tunnel mode ipsec ipv4
  tunnel protection ipsec profile ipsec-vpn-02
  ip tcp adjust-mss 1379
  no shutdown
exit
!
!
!==================
!BGP Configs - Tunnel2
!===================
router bgp 65000
  neighbor 169.254.45.33 remote-as 64512
  neighbor 169.254.45.33 activate
  neighbor 169.254.45.33 timers 10 30 30
  address-family ipv4 unicast
    neighbor 169.254.45.33 remote-as 64512
    neighbor 169.254.45.33 timers 10 30 30
    neighbor 169.254.45.33 default-originate
    neighbor 169.254.45.33 activate
    neighbor 169.254.45.33 soft-reconfiguration inbound
    network 0.0.0.0
  exit
exit
!